Banner Ad

Sunday, July 17, 2016

Visual Studio 2015 : Unable to open .CSHTML files

By Francis   Posted at   1:19 AM   Visual Studio Tips and Tricks 6 comments
                               
Unable to open CSHTML File in VisualStudio
                                 Visual studio 2015 is very cool IDE. It offers more and more benefits to increase the productivity of a developer. For my local development I’m using VS 2015 “Community” Edition. Also, I have updated with latest “Update 3” from here.

The Problem:
                         But after some days,  when i want to open a .cshtml file in my solution, VS throws some strange isssue, that is a pop up throws with the message “"Operation could not be completed. Invalid Pointer."

The Solution:
                     I’m not pretty much sure, this error is because of “Update 3”. But i soloved this issue by following the below steps:

  1. Close your VS instance
  2. Open the “Run” dialog (by pressing the short cut Windows Key +R).
  3. Type “%LocalAppData%” (without quotes).
  4. It will open the path “C:\Users\YOURUSERNAME\AppData\Local” in that navigate to “Microsoft –> Visual Studio –> 14.0 –>ComponentModelCache”.
  5. It contains some “cache” files, just delete them all.
  6. Now open the VS 2015 again. You can open the .cshtml files, without any problem.
The above trick, worked for me. This issue also discussed in this github thread. There are various solutions disscused over there, but i found this one is working for me, which is among one they discussed.

If you are one of the victim, hope this post may be useful for you!  Smile

Wednesday, July 13, 2016

WCF : Service Configuration Editor

By Francis   Posted at   3:44 PM   WCF No comments
WCF ConfigEditor                           

                  Windows Communication Foundation involves lot of configuration apart from service coding. Configuring the WCF service is a tedious process also. In order to configure the WCF Services, we need to put our hand mostly on the web.config file, where all the configuration elements resides. As a WCF service developer, I know it is little bit tedious process to configure an simple binding element in the configuration section.

In order to simplify (as much as possible) the configuration process, Microsoft provides an utility to configure the WCF service called “WCF Service Configuration Editor”, which is available as a built –in utility with Visual Studio.

In this particular post, i’m going to explain how to use the WCF Service Configuration editor and how to set different end points with it.

Open WCF Configuration Editor:
                             You can open the WCF Configuration Editor using the menu “Tools –> WCF Configuration Editor”. Otherwise, you can right click on the Web.config file and select “Edit WCF Configuration” on the context menu.

 Create Binding:

1. In the WCF Config Editor, select “Bindings” in the left “Configuration” tree view and click the “New Binding Configuration” link button.

Add Binding Configuration
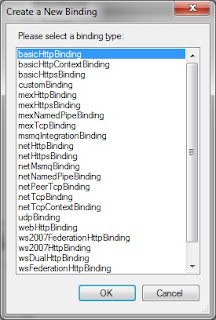
2. It will open the “Create a new binding” dialog. In this select the respective binding you want. For this, example i will go with “Basic Http Binding” option and then click “OK”.


3. WCF Cofig Editor, will provide the all the attributes in the table format
under the “Binding” tab. You can configure the attribute by setting the valid values. I have set the “Name”  as “Sample Http Binding”.
Configure Binding Attribute

4. If you select “Security” tab, security related attributes are populated as a table format,where you can set the values related to security.

Security Settings

Create End Point:

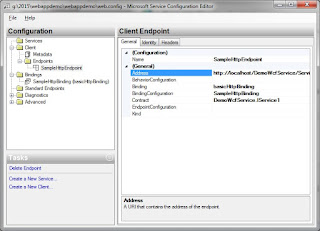
1. Select the "Endpoints” node in the “Configuration” treeview. Then click “New Client Endpoint” link button.


2. Previously we have created “Basic Http Binding”, So we need to select the “binding” as “Basic Http Binding”.
                                      

3. For “Contract” attribute value, click the browse button and select the WCF service’s dll location. It will extract the Contract from the dll and put it there. Otherwise, you can manually set it.
4. Set the “Address” attribute as the web service location, that is the url, where the WCF service was hosted.
I have set the mandatory attribute alone in the above steps. There are lot of options will be available under the “Identity” tab. if you need any one of these you can set it.

So we are good with our configuration, just save it using “File –> Save”. As a result, the “Web.config” file will be updated with the values which we have configured just now.


Web.config with configured binding and endpoint
As a whole, if you are going to configure some complex binding at this time “WCF Configuration Editor” really helpful!

Readers! I hope this article is helpful. Please let me know your thoughts as comments!
Connect with Us