Banner Ad

Tuesday, August 2, 2016

ASP.Net MVC - ViewBag, ViewData and Tempdata

By Francis   Posted at   9:08 PM   ASP.Net MVC No comments


                  As an ASP.Net MVC developer, you may frequently involved with these terms like Tempdata, viewdata and viewbag. In this post, I’m going to discuss about what are they and what are the main difference between them.

ViewBag:

  1. ViewBag is dynamic in nature.
  2. There is no type casting needed.
  3. Life time lasts only for the current request.

View Data:
  1. ViewData is stored as a dictionary. You can store a value using a key.
  2. Type casting is needed, when you retrieve.
  3. Life time lasts only for the current request.

Tempdata:

  1. It’s also store the value using key.
  2. Need type casting when the stored value retrieved.
  3. The life time of tempdata is little bit tricky. It will be available till you read it first time. After you read it, it will be marked for deletion. So in the next request, it won’t available.  However, you can extend it’s life time by using keep and peek method.

Hope this helps!

Sunday, July 17, 2016

Visual Studio 2015 : Unable to open .CSHTML files

By Francis   Posted at   1:19 AM   Visual Studio Tips and Tricks 6 comments
                               
Unable to open CSHTML File in VisualStudio
                                 Visual studio 2015 is very cool IDE. It offers more and more benefits to increase the productivity of a developer. For my local development I’m using VS 2015 “Community” Edition. Also, I have updated with latest “Update 3” from here.

The Problem:
                         But after some days,  when i want to open a .cshtml file in my solution, VS throws some strange isssue, that is a pop up throws with the message “"Operation could not be completed. Invalid Pointer."

The Solution:
                     I’m not pretty much sure, this error is because of “Update 3”. But i soloved this issue by following the below steps:

  1. Close your VS instance
  2. Open the “Run” dialog (by pressing the short cut Windows Key +R).
  3. Type “%LocalAppData%” (without quotes).
  4. It will open the path “C:\Users\YOURUSERNAME\AppData\Local” in that navigate to “Microsoft –> Visual Studio –> 14.0 –>ComponentModelCache”.
  5. It contains some “cache” files, just delete them all.
  6. Now open the VS 2015 again. You can open the .cshtml files, without any problem.
The above trick, worked for me. This issue also discussed in this github thread. There are various solutions disscused over there, but i found this one is working for me, which is among one they discussed.

If you are one of the victim, hope this post may be useful for you!  Smile

Wednesday, July 13, 2016

WCF : Service Configuration Editor

By Francis   Posted at   3:44 PM   WCF No comments
WCF ConfigEditor                           

                  Windows Communication Foundation involves lot of configuration apart from service coding. Configuring the WCF service is a tedious process also. In order to configure the WCF Services, we need to put our hand mostly on the web.config file, where all the configuration elements resides. As a WCF service developer, I know it is little bit tedious process to configure an simple binding element in the configuration section.

In order to simplify (as much as possible) the configuration process, Microsoft provides an utility to configure the WCF service called “WCF Service Configuration Editor”, which is available as a built –in utility with Visual Studio.

In this particular post, i’m going to explain how to use the WCF Service Configuration editor and how to set different end points with it.

Open WCF Configuration Editor:
                             You can open the WCF Configuration Editor using the menu “Tools –> WCF Configuration Editor”. Otherwise, you can right click on the Web.config file and select “Edit WCF Configuration” on the context menu.

 Create Binding:

1. In the WCF Config Editor, select “Bindings” in the left “Configuration” tree view and click the “New Binding Configuration” link button.

Add Binding Configuration
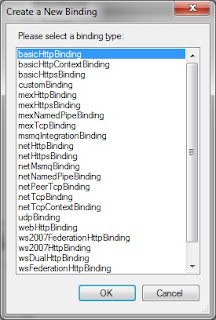
2. It will open the “Create a new binding” dialog. In this select the respective binding you want. For this, example i will go with “Basic Http Binding” option and then click “OK”.


3. WCF Cofig Editor, will provide the all the attributes in the table format
under the “Binding” tab. You can configure the attribute by setting the valid values. I have set the “Name”  as “Sample Http Binding”.
Configure Binding Attribute

4. If you select “Security” tab, security related attributes are populated as a table format,where you can set the values related to security.

Security Settings

Create End Point:

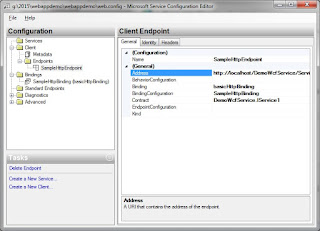
1. Select the "Endpoints” node in the “Configuration” treeview. Then click “New Client Endpoint” link button.


2. Previously we have created “Basic Http Binding”, So we need to select the “binding” as “Basic Http Binding”.
                                      

3. For “Contract” attribute value, click the browse button and select the WCF service’s dll location. It will extract the Contract from the dll and put it there. Otherwise, you can manually set it.
4. Set the “Address” attribute as the web service location, that is the url, where the WCF service was hosted.
I have set the mandatory attribute alone in the above steps. There are lot of options will be available under the “Identity” tab. if you need any one of these you can set it.

So we are good with our configuration, just save it using “File –> Save”. As a result, the “Web.config” file will be updated with the values which we have configured just now.


Web.config with configured binding and endpoint
As a whole, if you are going to configure some complex binding at this time “WCF Configuration Editor” really helpful!

Readers! I hope this article is helpful. Please let me know your thoughts as comments!

Tuesday, May 3, 2016

Conventional File Uploading in ASP.Net

By Francis   Posted at   5:12 PM   ASP.Net No comments
This post is going to give some basic ideas about file uploading in ASP.Net. Mostly every data driven web site will provide this feature. Also, every ASP.Net developer face this kind of requirement at least once in his/her developer life.


Note:
      The file upload control renders slightly/completely different from browser to browser. If you want to give a consistent UI, you can check my previous post here.

If you want to upload a file in ASP.Net, it is very simple. You need to include “File Upload” control on your form and place a command button, which triggers the upload process and save the respective file in the specified location on the server.


<div> 
           <asp:FileUpload runat="server" ID="fileUploader" AllowMultiple="false" /> 
           <br /> 
           <asp:Button runat="server" Text="Upload" ID="btnUpload" OnClick="btnUpload_Click" /> 
</div>

On the code behind you should include the below lines:

protected void btnUpload_Click(object sender, EventArgs e)    
       {     
           if(fileUploader.HasFile)     
           {     
               fileUploader.SaveAs(Server.MapPath(@"~\UploadedFile\")+ fileUploader.FileName);     
           }     
       }     


Note:
In the above code snippet, when you click the button, it will save the file in a specified location on the server. As per the above code, it looks for the directory “UploadedFile” in the server. So you need to create the directory on your application, before executing the code, otherwise the application will throw an error while run.

Upload specific File Types:
In some cases, we may want to force the user upload only the specific file types. This is an inevitable scenario for the professional programmers. In this case, we should validate the file types, if it pass then we can go with upload. Otherwise, the user will be notified by an “error” message. In order to validate, I’m going to use the built-in ASP.Net validation control.

<div> 
            <asp:FileUpload runat="server" ID="fileUploadExcel" AllowMultiple="false" /> 
            <br /> 
            <asp:Button runat="server" Text="Upload" ID="btnUploadExcel" OnClick="btnUploadExcel_Click" /> 
            <asp:RegularExpressionValidator runat="server" ControlToValidate="fileUploadExcel" 
                ValidationExpression="^.*\.xls[xm]?$" 
                ErrorMessage="Please upload excel file only"></asp:RegularExpressionValidator> 
</div>


The code behind not much changed compare to the previous one.

protected void btnUploadExcel_Click(object sender, EventArgs e)    
        {     
            if (fileUploadExcel.HasFile)     
            {     
                fileUploadExcel.SaveAs(Server.MapPath(@"~\UploadedFile\") + fileUploadExcel.FileName);     
            }     
        }

Restrict File Size:
In some cases, we need to restrict the file size. Say for example, we may need to force the user to upload an excel file not more than 1 MB. At this case, we should validate this one from the server as shown below:

protected void btnUploadExcel_Click(object sender, EventArgs e)    
      {     
          if (fileUploadExcel.HasFile)     
          {     
              int fileSize = fileUploadExcel.PostedFile.ContentLength;     
              if (fileSize <= 1048576)     
                  fileUploadExcel.SaveAs(Server.MapPath(@"~\UploadedFile\") + fileUploadExcel.FileName);     
              else     
              {     
                  lblError.Text = "File size exceeds more than 1 MB.";     
              }     
          }     
      } 

Upload Multiple Files:
In some cases, we may need to upload multiple files. ASP.Net gives an easy way to achieve this. The file upload server controls had a property called “AllowMultiple”, which is a boolean value (either true or false). By turn it as “true”, the file upload control control allows you to select multiple files.

<div> 
<asp:FileUpload runat="server" ID="fileUploadMultiple" AllowMultiple="true" /> 
<br /> 
<asp:Button runat="server" Text="Upload" ID="btnUploadMultiple" OnClick="btnUploadMultiple_Click" /> 
<asp:RegularExpressionValidator runat="server" ControlToValidate="fileUploadMultiple" 
ValidationExpression="^.*\.doc[x]?$" ID="RegularExpressionValidator1" 
ErrorMessage="Please upload word file only"></asp:RegularExpressionValidator> 
<asp:Label runat="server" ID="Label1" Style="color: red;"></asp:Label> 
</div>

In the code behind, the code like below. It get the files and loop thru the selected files and check the file size then store it in the particular path.

protected void btnUploadMultiple_Click(object sender, EventArgs e)    
{     
    if (fileUploadMultiple.HasFile)     
    {     
        HttpFileCollection files = Request.Files;     
        for (int i=0;i < files.Count;i++)     
        {     
            HttpPostedFile file = files[i];     
            if(file.ContentLength >0)     
            fileUploadMultiple.SaveAs(Server.MapPath(@"~\UploadedFile\") + file.FileName);     
        }     
    }     
}    


I hope this post gives an some basic understanding and standard validations during the File upload in ASP.Net. Let me know your thoughts as comments. Happy Coding! Smile

Sunday, March 13, 2016

Identify the ASP.Net Version of an ASP.Net Application from Browser

By Francis   Posted at   2:12 PM   Web Development No comments
                    

                        In my previous article, i explained about how to use IE Developer tool bar. As a web developer, whenever I browse a “cool” website, i always want to know about what type of technology behind this. As an ASP.Net developer, in this post, i’m going to discuss about how to identify a particular website is built with ASP.Net or Not from the popular browsers like IE, Chrome and Firefox. There are various ways exist, I’m here listed few of them.
Analyze the Source Code:
                       If a website is built with ASP.Net Webforms you can identify it by review the “markup” source code from the browser. If the website built with web form then you can find the hidden element called “viewstate” in the source code. This will hint that the page you are viewing is developed using ASP.Net Web Form. 
                     This is the easiest way to find whether the website you are viewing built with ASP.Net web form or not. But this technique, will not tell the version of the ASP.Net. If you want, to know about the version information also then you need to follow any one of the below ways.

Use third party plugins:
                    Yes! There are third party browser plugin also available for this purpose. You can find the one in the below url: http://builtwith.com/toolbar
                    This plugin is available for most of the popular browsers like Firefox, Chrome and Safari except IE, when i write this post. Just include this on your browsers and you can find out the technology behind with the currently rendered on the browser.
Using Built with Addon
Using Developer Toolbar:
                         IE doesn’t require any plugins or add-ons. You can find the technology behind this using the built-in tool called “IE Developer Toolbar”. This toolbar, contains a tab called “Network”. In this tab, you can find the necessary detail.

Read : How to use IE Developer Toolbar.


Using Fiddler:
                     As all of us know that Fiddler is a famous Web Debugger, which is also provide the facility to analyse the response header elements as the previous one. If you don’t have Fiddler you can download it from this url: https://www.telerik.com/download/fiddler


Readers, hope you enjoy this post. Let me know your thoughts as comments!
Connect with Us