Visual Studio is a great IDE for developing all type of Microsoft desktop/web stack applications. There is no doubt on that!. One of the main feature provided in Visual Studio is it’s capability provide more options to debugging the applications. In this post I explained some basic concepts about debugging in Visual Studio.
You can also check my other Visual Studio Tips here.
Setup the environment:
In this post I’m using Visual Studio 2015 Community edition. Based on your version of Visual studio some options may differ. For simple and neat explanation, here I’m going to use a simple for loop C# code snippet.
So What is breakpoint?
When you run the program in Visual Studio IDE, if you want to check the execution of a particular routine or function at that time you can set the breakpoint. Probably, it set before to run the application. So when the program executes, the breakpoint hits and the program waits there. So that you can step into the program and take a deep look into the code and check the values there itself. This is the main advantage of breakpoints.
Set normal Breakpoint:
Set the breakpoint in an application is very simple. You can hit the F9 key or you can click on the left most border in Visual Studio. It will keep the break point on the particular line.
After setting the break point, Visual Studio indicate the particular line with the Red color and preceded with a dot like below.
In these kind of break points, it will hit without any conditions. So whenever, the execution cross the line it will simply hit there.
Set Conditional Breakpoint:
So as we discussed in the previous section,say for example, if we set the break point with in a loop it will hit the break point without any condition. So the break point is hit often. Instead of this, we may want to set some conditions. Let’s see how we can do it.
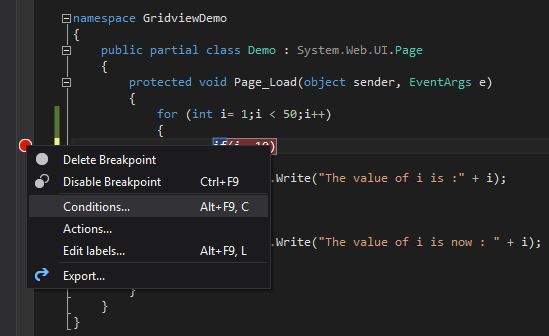
1. Right click on the break point and select “Conditions…” in the context menu.
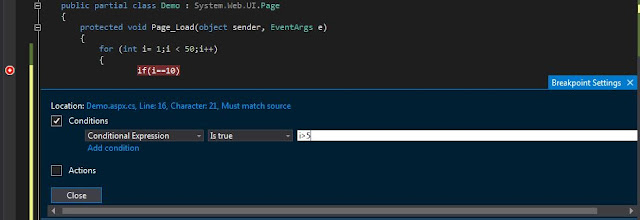
2. Visual Studio 2015 offers the below “Breakpoint Settings” window to set up the condition.
3. Here I’m going to set the “Conditions” as : When the counter value(i) is greater than 5 at that time it will hit the break point. That means, till the value of the counter value is 5, it will not hit. After that it will hit.
In some cases you may want to track based on some process id or thread id etc. Visual studio also give options for this.
In some cases, we want to count the “Hit count”,meant whenever the break point hits it will consider as a hitcount. You can specify it by selecting “Hit Count” list item as below:
Set Actions:
“Breakpoint Settings” window also offers that log message to Output window. At that you can make use of “Actions”. There are some special keywords are there, which have a special meaning when you use in the “Action” text box.
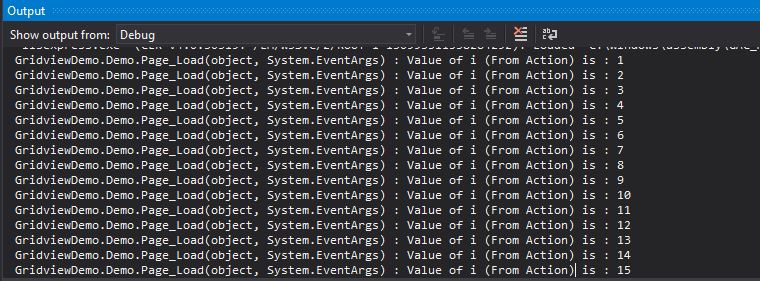
When you specify Action alone, there is a checkbox named “Continue execution”, if you check this the breakpoint will not hit. You can see the message in the “Output Window”.
In the above action, we specify the special keyword "$Function", which prints the current function name as you see in the above screen shot.
Disable Break points:
In some cases, you may want to continue the execution of your program without hitting the breakpoints and later cases you may need them. At that time you can use the "Disable Breakpoint" option by using the short cut key "Ctrl + F9" key. Later cases, you can use the same short cut key to "Enable Breakpoint". You can make use of these options during run time also.
Readers, hopefully this tutorial helps you to understand about the various debugging options provided by Visual Studio. Let me know your thoughts as comments. Happy programming!
You can also check my other Visual Studio Tips here.
Setup the environment:
In this post I’m using Visual Studio 2015 Community edition. Based on your version of Visual studio some options may differ. For simple and neat explanation, here I’m going to use a simple for loop C# code snippet.
So What is breakpoint?
When you run the program in Visual Studio IDE, if you want to check the execution of a particular routine or function at that time you can set the breakpoint. Probably, it set before to run the application. So when the program executes, the breakpoint hits and the program waits there. So that you can step into the program and take a deep look into the code and check the values there itself. This is the main advantage of breakpoints.
Set normal Breakpoint:
Set the breakpoint in an application is very simple. You can hit the F9 key or you can click on the left most border in Visual Studio. It will keep the break point on the particular line.
After setting the break point, Visual Studio indicate the particular line with the Red color and preceded with a dot like below.
 |
| Breakpoint-in-VisualStudio |
In these kind of break points, it will hit without any conditions. So whenever, the execution cross the line it will simply hit there.
Set Conditional Breakpoint:
So as we discussed in the previous section,say for example, if we set the break point with in a loop it will hit the break point without any condition. So the break point is hit often. Instead of this, we may want to set some conditions. Let’s see how we can do it.
1. Right click on the break point and select “Conditions…” in the context menu.
 |
| Conditional-Breakpoint-Menu |
 |
| Conditional-Breakpoint-Window |
 |
| Set-Conditions |
In some cases, we want to count the “Hit count”,meant whenever the break point hits it will consider as a hitcount. You can specify it by selecting “Hit Count” list item as below:
 |
| Breakpoint-Window-HitCount |
Set Actions:
“Breakpoint Settings” window also offers that log message to Output window. At that you can make use of “Actions”. There are some special keywords are there, which have a special meaning when you use in the “Action” text box.
 |
| Breakpoint-Window-Action-SpecialKeyword |
 |
| Breakpoint-Window-Specify-Action |
 |
| Breakpoint-Window-Result-in-OutputWindow |
Disable Break points:
In some cases, you may want to continue the execution of your program without hitting the breakpoints and later cases you may need them. At that time you can use the "Disable Breakpoint" option by using the short cut key "Ctrl + F9" key. Later cases, you can use the same short cut key to "Enable Breakpoint". You can make use of these options during run time also.
 |
| Disabled-Breakpoint |


