Banner Ad

Showing posts with label Visual Studio. Show all posts

Sunday, July 17, 2016

Visual Studio 2015 : Unable to open .CSHTML files

By Francis   Posted at   1:19 AM   Visual Studio Tips and Tricks 6 comments
                               
Unable to open CSHTML File in VisualStudio
                                 Visual studio 2015 is very cool IDE. It offers more and more benefits to increase the productivity of a developer. For my local development I’m using VS 2015 “Community” Edition. Also, I have updated with latest “Update 3” from here.

The Problem:
                         But after some days,  when i want to open a .cshtml file in my solution, VS throws some strange isssue, that is a pop up throws with the message “"Operation could not be completed. Invalid Pointer."

The Solution:
                     I’m not pretty much sure, this error is because of “Update 3”. But i soloved this issue by following the below steps:

  1. Close your VS instance
  2. Open the “Run” dialog (by pressing the short cut Windows Key +R).
  3. Type “%LocalAppData%” (without quotes).
  4. It will open the path “C:\Users\YOURUSERNAME\AppData\Local” in that navigate to “Microsoft –> Visual Studio –> 14.0 –>ComponentModelCache”.
  5. It contains some “cache” files, just delete them all.
  6. Now open the VS 2015 again. You can open the .cshtml files, without any problem.
The above trick, worked for me. This issue also discussed in this github thread. There are various solutions disscused over there, but i found this one is working for me, which is among one they discussed.

If you are one of the victim, hope this post may be useful for you!  Smile

Sunday, October 25, 2015

Visual Studio : How to install Nuget packages in your project?

By Francis   Posted at   2:00 AM   Visual Studio Tips and Tricks No comments
               In this article I’m going to explain about how to install/uninstall Nuget packages for your application in Visual Studio using “Nuget Package Manager” and “Package Manager Console”. I assume that you have Visual Studio 2013/2015 on your machine.
                    Before that, if you are not aware about “Nuget” means, the below sentence is for you:
                  “NuGet is the package manager for the Microsoft development platform including .NET. The NuGet client tools provide the ability to produce and consume packages. The NuGet Gallery is the central package repository used by all package authors and consumers.”
Install Nuget Package using ‘Nuget Package Manager’:
Step 1:
Rightclick on your project and select  “Manage Nuget Packages”.


Step 2:
Now the “Nuget Package Manager” window will appear with the list of nuget packages.

Step 3:
In the search box, type the package you look for and hit enter. In this example, I just searched for “routedebugger” package and installed it by clicking the “Install” button.

Step 4:
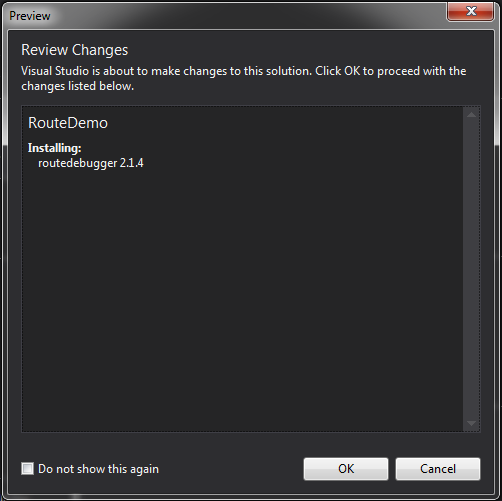
While installing if the downloaded package tries to change the files in the solution/project it will popup the dialog to warn us. Just click “OK” for it and you can see the “installation progress” in the Output window.


Step 5:
Now you can just expand the “Solution Explore” window, see in the “Reference” to check that particular reference is added or not.

Uninstall NuGet Package using ‘Nuget Package Manager’:
Step 1:
If you want to uninstall, again go to the “Nuget Package Manager” and search for the particular package.Visual Studio automatically finds that particular package is installed on not and now you can see the “Uninstall”  button.


Step 2:
Since it made some changes in the project while installing, so it will automatically revert the changes in the file. So again it will popup the dialog. just click “OK”. Also in output window you can see the uninstall status.


Install NuGet Package using ‘Package Manager Console’:
Alternatively, you can use the “Package Manager Console” in Visual studio to install the necessary packages by running the respective command.
Step 1:

Go to www.nuget.org and type the package name in the search box and go to the particular package’s page, there you can find the “Package Manager Console” command.


Step 2:
To open the Package Manager Console, Tools –>NuGet Package Manager –> Package Manager Console.

Just copy the command from above website and paste it on the package manager console and hit enter.


Note :  Before hit enter key, just check the project name in the “Default project” dropdown. Incase, if you have lot of projects, you must pay attention on this by selecting correct project.
Uninstall NuGet Package using ‘Package Manager Console’:
Step 1:
In order to uninstall, just type the below command in the “Package Manager Console” and hit enter, it will uninstall the package: Uninstall-Package routedebugger.


That’s all! Hope this will helpful for someone!! Let me know your thoughts as comments!

Wednesday, September 9, 2015

How to publish ASP.Net Web application using Visual Studio 2015

By Francis   Posted at   6:52 PM   Visual Studio No comments

                             In this post, we are going to see a step by step procedure using the custom profile option. In other words, this post is going to explain how to publish the website in local file system.

                       The main purpose of publish dialog is provide an simplified way to take the file list which need to be publish on your website. In this article I’m going to explain how to publish a MVC web application using the “publish” dialog provided in VS 2015.

 Step 1 : Open Publish Dialog

                    You can open the publish dialog by “Right Click” on the project then select “Publish” on the floating menu.

PublishCommand


Step 2: Create Profile

                       As a first step, you should create a profile before publishing. This is just one kind of grouping, say for example you can create multiple profile one for Azure and one for local. So when next time you open this dialog you can see the profiles and select from them.

PublishDialog

I have selected “Custom” as a “Publish Target” and gave profile name as “LocalPublish”.

PublishProfileDialog

Step 3: Select the Connection

In this step, we need to tell where our published files are going to be. You can publish the files directly on your server also by selecting “Web Deploy” publish method or you can use FTP too.

PublishOptions

Since I’m going to publish files in local file system so I selected “File System”.

PublishInLocal

Step 4: Select Configuration and other settings

In this step, you can choose “Configuration” mode and other settings like delete files before publishing in the specific folder, precompile etc.

PublishMode


Step 5: Preview & Publish

You are about to complete your publishing. Click publish to start the publishing.

PublishPreview

In the output window you can see the result of the publish.

OutputWindowAck


Hope this post is useful who are all using the “Publish” option in Visual Studio 2015.

Happy Coding!!

Tuesday, March 11, 2014

Visual Studio Tips & Tricks - 8: Breakpoint will not currently be hit. No symbols have been loaded for this project.

By Francis   Posted at   5:50 PM   Visual Studio Tips and Tricks 2 comments

Most of the developers who are using Visual studio have encountered the above problem. As a ASP.Net Developer I have this atleast once a day. So the below are my tricks to get ride of this issue.


1) Just Close the VS IDE.

2) Go to Task Manager and kill the worker process. (If you are working on  ASP.Net application).

3) Go to the .Net installation folder ( Normally it should be C:\Windows\Microsoft.NET\Framework\v4.0.30319\Temporary ASP.NET Files OR C:\Windows\Microsoft.NET\Framework64\v4.0.30319\Temporary ASP.NET Files) and clear the temp files from the temporary folder.

4) Open the solution and "Rebuild" entire solution. Now try to attach the debugger.


Please note that, in some machines you may have 2 framework installation, one for 32-bit and another for 64-bit. So when you go with step 3, pay close attention and make sure which .net framework was used and also which version no (either 2,3,3.5 or 4) was used by your application.


Hope this helps!

Tuesday, March 4, 2014

Visual Studio Tips & Tricks – 6 : Multi-Copy functionality in Visual Studio

By Francis   Posted at   12:26 PM   Visual Studio Tips and Tricks No comments

                                    Some time we may need to copy the multiple code snippets (that is we may need to copy and paste lines that are not in order) in a file and paste it in another location of the file inside Visual Studio. For example, we have 5 lines of text, what we need is to copy the 1,3 and 5 line of text and paste it on some other location. To achieve that functionality to do the following:


1) Copy the code snippets using Ctrl+C key combination. (That is select the line 1 and press Ctrl + C and select line 3 press Ctrl + C and so on).

2) When you paste that code press the key combination Ctrl + V + Shift key, which rotates the copied lines of text. To paste a particular selected text just press Ctrl + V.


Hope this helps to some one!

Monday, October 14, 2013

Visual Studio Tips & Tricks: 5 - Hexa Decimal values displayed during Debug the application

By Francis   Posted at   9:27 AM   Visual Studio Tips and Tricks No comments
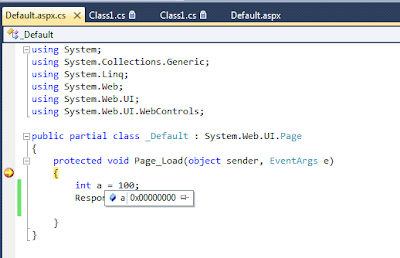
                  Recently, I had a wired problem in Visual studio. In this post i’m going to discuss about it. The problem is, when I try to debug my application in Visual Studio 2010, the values are displayed in Hexadecimal format. Please take a look into the below picture.
Hexa Decimal values displayed during Debug the application
Values of Variable Displayed in Hexa Decimal Format
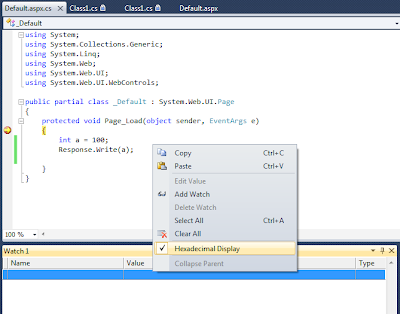
The reason is somehow the “Hexadecimal Display” option has been checked in the “Watch” window.
“Hexadecimal Display” option in Watch Window

So that all the values are displayed in Hexadecimal form in watch window too.
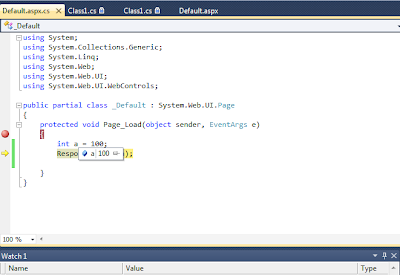
So just disable the “Hexadecimal Display” in the watch window’s float menu. The display will correctly display in the decimal form.
Values of Variable Displayed in Decimal Format


Hope this helps someone!

Thursday, August 22, 2013

Visual Studio Tips &Tricks : 3 – Ctrl+, - File Search Easy

By Francis   Posted at   11:28 AM   Visual Studio Tips and Tricks No comments
                 Whenever the project grows large it’s hard to take the necessary file in Visual studio. That is we need to traverse a lot of folders or sub folders if we know the file where it was exactly. 

                  Sometimes, when you deployed in a new project, if another user just mention a file name and ask you take a look about particular logic its really painful to find that file where it was located exactly.

                   At these times the hot key combination Ctrl + , (Control Key with Semicolon) comes a handy. Which opens “Navigate To” window in which if we started type it will list down the file name in a quicker manner. So that we can pick up the file easily.
Navigate To - Window 

                   It not only listed the File names, it also list down the method name too. So whether you search a method or File use the 
shortcut key Ctrl+, and navigate quicker.

Please give your valuable comments which improves my future articles!

Hope this helps a bit!

Tuesday, August 20, 2013

Work Around: Break Point Not Hitting in Visual Studio

By Francis   Posted at   11:14 AM   Visual Studio No comments
                In my professional experience with Visual studio sometimes break point doesn’t hit when we attached to the Worker process. It just tells that Symbols are not loaded.

                 The below are the possible workaround to solve this problem (Try it one by one in this case):
  1. Clean and Rebuild the Solution/Project.
  2. Close all the windows using Window -> “Close All Documents” and restart the Visual Studio. Then Build/Rebuild the Solution/Project.
  3. Go to the Temporary Folder (which is available in the .Net Framework installed Location) and clean the Temporary files of that Solution/Project. Kill the worker process and rebuild the solution.
Hope this helps a bit!


Thursday, June 20, 2013

Visual Studio Tips & Tricks

By Francis   Posted at   11:31 AM   Visual Studio Tips and Tricks No comments
Visual Studio Tips & Tricks - 1:

One of the best feature of Visual Studio is it’s Documentation facility, which is used to comment the functions, procedures automatically. In VS, you can achieve that by putting three single quotes sequentially (See the image below). There is no doubt it’s a one of the good feature of VS.
Auto Comment Facility Provided by Visual Studio

         Few days ago, in my VS Solution which use more than one projects these feature doesn’t work. It’s because the documentation feature not enabled. To enable this feature to do the following:

RightClick Project ->Select “Properties”  ->Select “Compile” tab ->Check the “Generate XML documentation file"

Enable/Disable Documentation Feature for a Project

That’s all the problem solved. Hope this helps!

Happy Coding!!

Monday, December 19, 2011

Visual Studio – An Overview

By Francis   Posted at   8:48 AM   Visual Studio 2010 No comments
What is Visual Studio?
Visual studio is an IDE (Integrated Development Environment) provided by Microsoft which is the One of the prominent Microsoft product. So what is integrated development environment? The answer is so simple.
You can develop A to Z of applications in a single development environment. That is, with visual studio you can develop from a console application to well equipped web application in a single environment. So that it is called as IDE.
The bottom line of this product is, it provided a multi language support also. You can develop the application with Visual Basic, C#, J#, VC++ etc. So this is the small introduction about visual studio.


In future articles, I will provide much examples on the visual studio concepts like short cut keys, shortcut functionalities etc.
Connect with Us